Moving Ants Into a New Test Tube Setup
At Ant Gear, we provide ants in clean test tube setups to ensure they arrive in the perfect environment for the queen and her colony. Although the ants will be fine in their test tube for some time, there may come a time when it needs replacing. This guide will show you when to replace the setup and how to prepare for your colony’s next stages of growth.
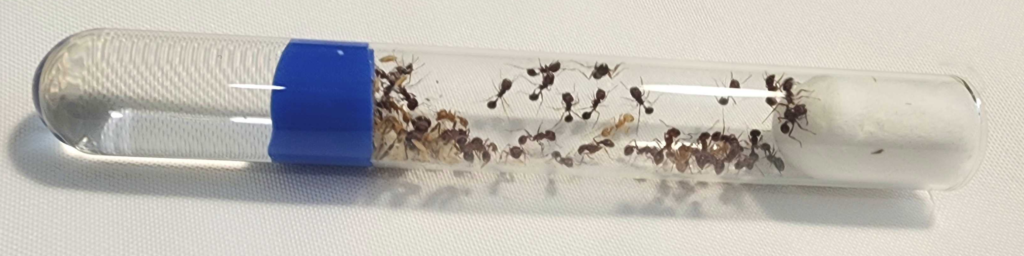
What is a Test Tube Setup?
A test tube setup is a small, enclosed environment designed to house queen ants and their colonies. It includes a water reservoir to maintain humidity and provide hydration, making it an ideal temporary home for your ants. The test tube is made to replicate the conditions of an underground nest, offering safety, stability, and a stress-free environment for your ants to thrive.
Why You Might Need to Replace a Test Tube Setup
There are specific signs to watch for that indicate it’s time to replace the setup:
- Low Water Levels: If the water reservoir dries out, the setup will no longer provide the necessary humidity for your colony.
- Crowding: If the colony has outgrown their test tube but they aren’t numerous enough to place into a formicarium, it might be time to upgrade to a larger test tube.
- Fungal Mold (Yellow): Fungal spores in the test tube signals unsanitary conditions that can harm your ants.
- Pink Cotton or Water: Pink discoloration in the cotton or water indicates bacterial growth, which needs immediate attention.
Note: Black mold, (what we refer to as “ant sludge”) is normal and expected in test tube setups. It results from the natural breakdown of waste and organic material within the test tube. While it may look unpleasant, it is not harmful to the ants and does not require replacing the setup unless it spreads excessively or compromises the cotton barrier.
How to Replace a Test Tube Setup
If your test tube setup shows signs of harmful mold, discoloration, or drying out, follow these steps to safely transition your ants to a new one.
What You’ll Need:
- An Ant Gear Test Tube Setup Kit, which includes a prepared test tube and Test Tube Transfer Caps
- OR A Homemade Test Tube Setup (push cotton into a test tube filled 1/2 way with water) and tape to connect the old and new test tubes
- A heat cable (optional but highly recommended).
- A dark cloth or privacy screen to make the new tube darker.
Step 1: Connect the Old and New Test Tubes
Use Test Tube Transfer Caps connected by clear tubing to link the old and new test tubes. Ensure the tubing fits securely to prevent escapes. Alternatively, tape the two test tubes together.

Step 2: Encourage the Ants to Move
Ants will only move to a new setup if it seems like a better habitat than their current one. The combination of warmth and darkness in the new test tube will help encourage them to migrate. We recommend that you:
- Use a heat cable to warm the new test tube slightly, making it more appealing to the ants. Place the heat cable opposite the water reservoir end of the new test tube. This will create a warm environment without condensation, which could drown the ants and brood.
- Expose the old test tube to light while keeping the new test tube covered with a dark cloth or a privacy screen. Ants naturally prefer darkness and will gravitate toward the more appealing environment.
Step 3: Monitor the Transfer
Allow the ants to move at their own pace. It might take a couple of days for them to move but usually they will do it overnight. Once the queen, workers, and brood have migrated, remove and safely dispose of the old test tube.
Conclusion
Ant Gear’s pre-assembled test tube setups provide everything your queen and colony need to thrive. By following these care tips, your ants can remain in the test tube setup until the colony has 20–25 workers, at which point you can transition them to an ant farm.
For replacement test tubes, transfer caps, heat cables, or additional supplies, visit the Ant Gear website. With proper care and attention, your colony will flourish!